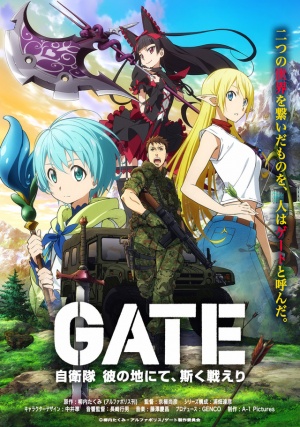
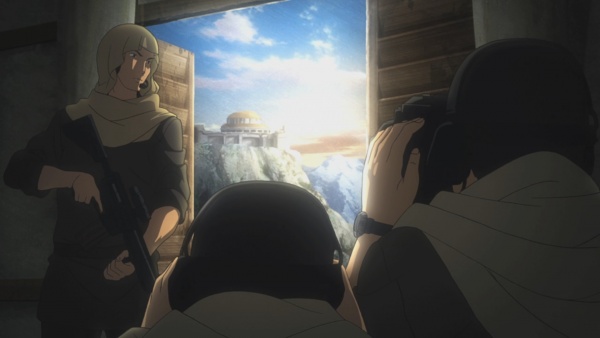
Gate: Thus the JSDF fought there [1st Cour poster]
(July 3, 2015 - September 19, 2015)

Gate: Thus the JSDF fought there [2nd Cour poster]
(January 8, 2016 - March 25, 2016)
Gate: Thus the JSDF Fought There (ゲート 自衛隊 彼の地にて、斯く戦えり Gate: Jieitai Kanochi nite, Kaku Tatakaeri) is an anime series that aired from July 3 to September 19, 2015. After a short hiatus, it reaired from January 9 to March 25, 2016.
In the summer of 20XX A.D., a mysterious portal opened in the Ginza district of Toyko, Japan, bringing forth the military of the Empire across it. However, the army is medieval-aged equipped and despite the dragons and monsters brought along, the Japanese Self-Defense Force quickly put them down after their small carnage. Establishing order, the Japanese Government declared the portal to be part of Japanese soil and sends the JSDF to investigate the mysterious land behind the portal. Second Lt. Youji Itami of the JGSDF (Japanese Ground Self-Defense Force) is appointed the commander of Third Recon Team to scout out the mysterious land.
The following weapons were used in the anime series Gate: Thus the JSDF Fought There:
Pistols
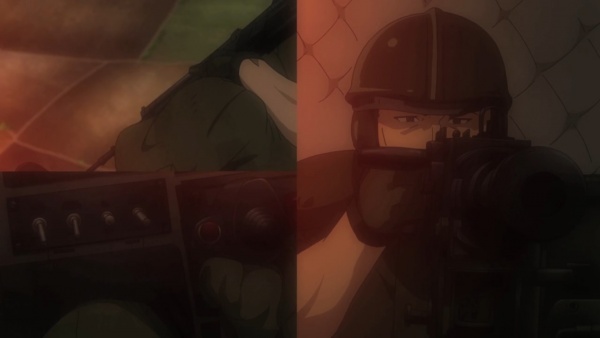
Minebea P9
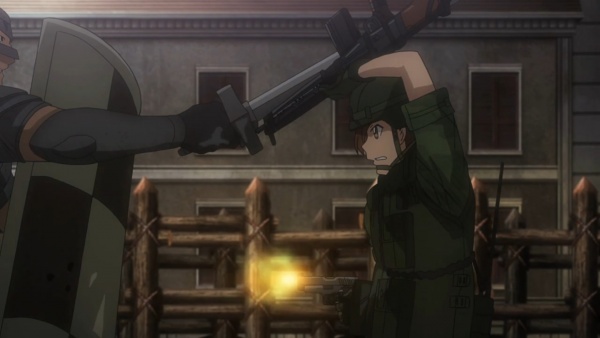
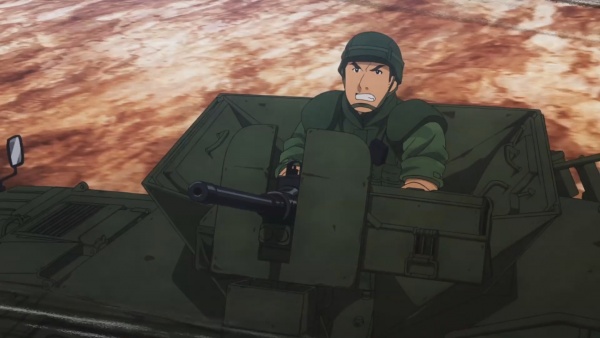
The JGSDF is equipped with the Minebea P9, a Japanese licensed copy of the SIG-Sauer P220, as their sidearms. Kuribayashi notably uses one in the Battle of Italica. Yurata in Episode 16 is also seen with one as a concealed carry.
Kuribayashi fires her P9 when she blocks a sword slash with her Type 64. (Ep.6)

Kuribayashi aiming the P9. (Ep.6)
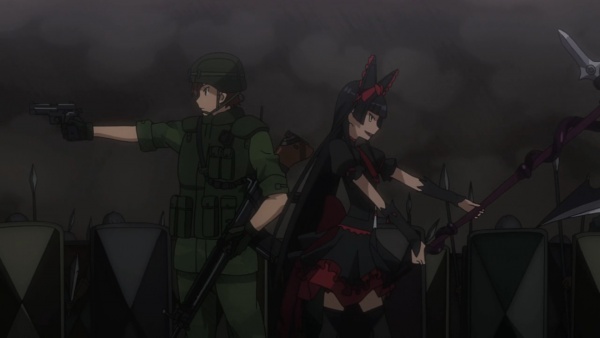
Kuribayashi with her P9 back to back with Rory Mercury. (Ep.6)
Kurokawa with the P9. (Ep.13)

Another view of Kurokawa's P9. Here we see the magazine release latch on the bottom of the magazine. (Ep.13)
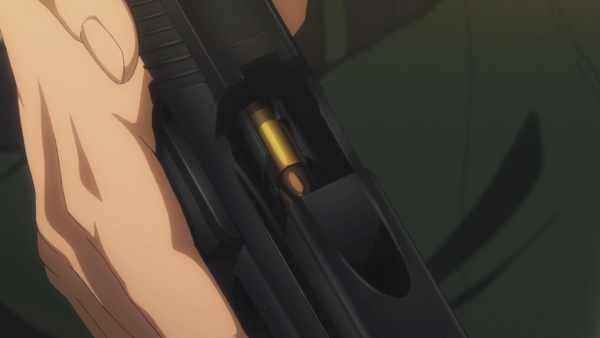
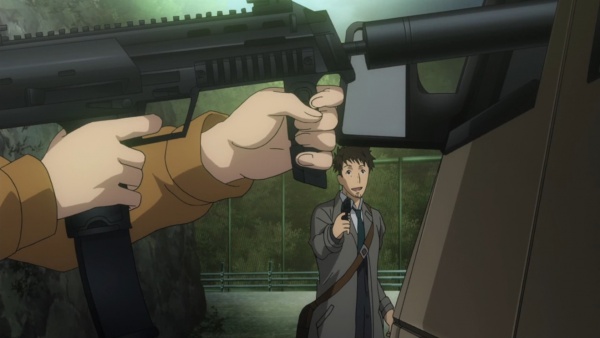
Itami chambers a round in his P9. (Ep.14)
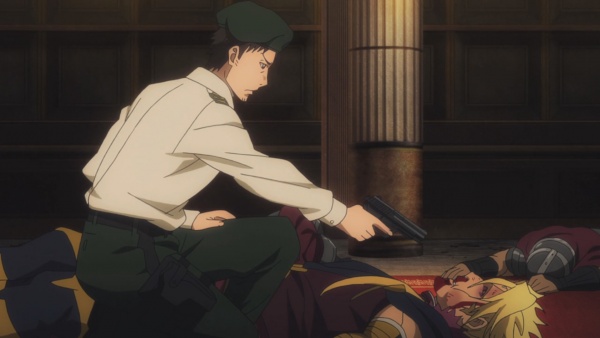
Itami interrogates Zorzal with his P9. (Ep.14)
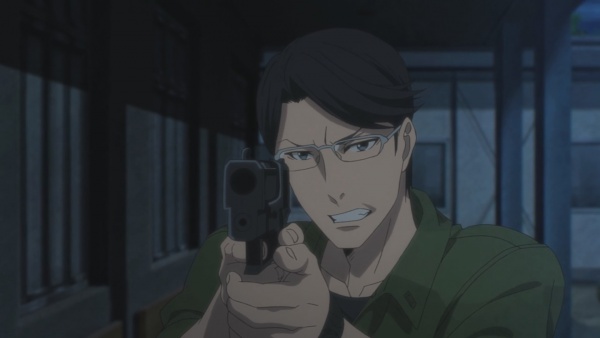
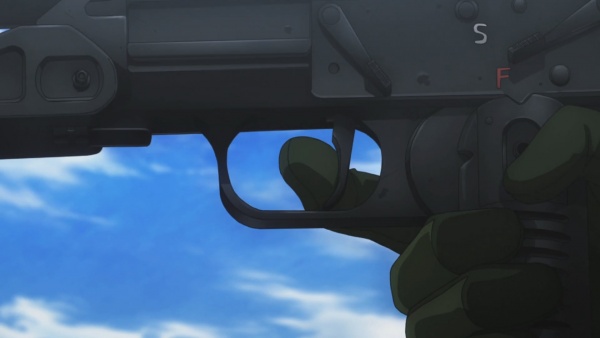
Yanagida aiming his P9. (Ep.16)
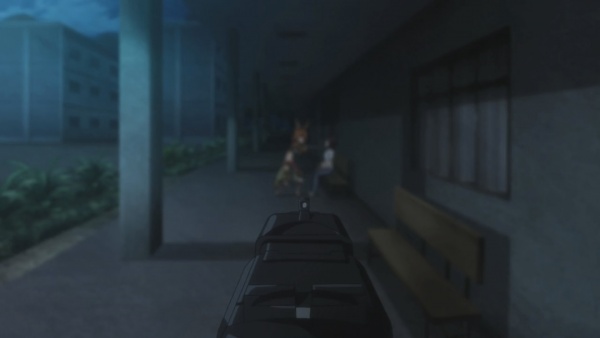
A first person view of the P9. (Ep.16)
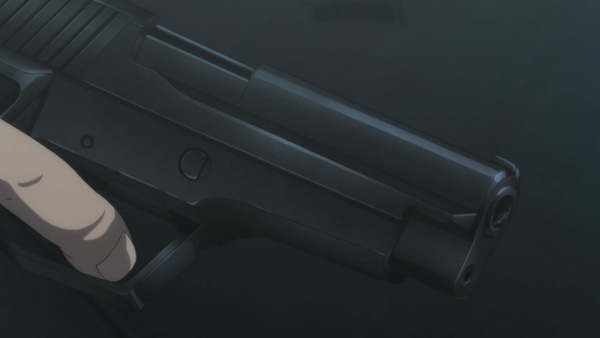
Close up of the P9 pistol. (Ep.16)

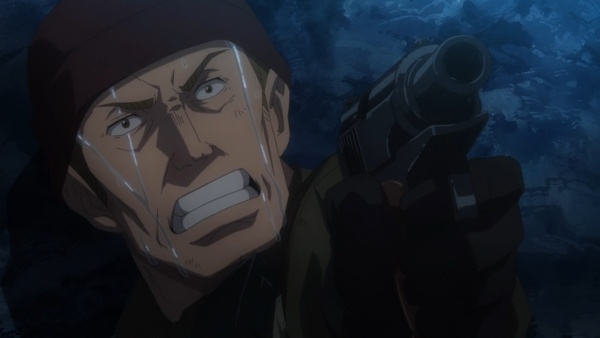
Colonel Kengun on the left fires his P9 at incoming Imperial cavalry. (Ep.23)
Makarov PM
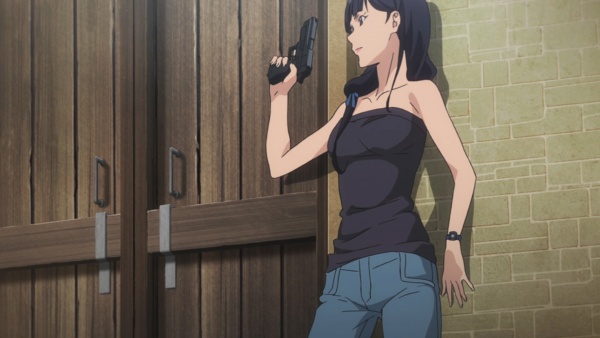
Agent Heidegger of the CIA is seen with a Makarov PM as his sidearm. Kuribayashi later acquires one for self-protection.

Makarov PM - 9x18mm Makarov
Heidegger draws his Makarov. (Ep.10)

Heidegger aims his Makarov at a Chinese operator. (Ep.10)
Heidegger continues to pull the trigger of his empty Makarov. (Ep.10)
Kuribayashi with a Makarov inside her coat. Note the screw on the back of the pistol grip. (Ep.10)
Revolvers
Nambu Model 60
A Tokyo Metropolitan Police Department (MPD) police officer fires his Nambu Model 60 at the Empire's forces during the Ginza Incident.
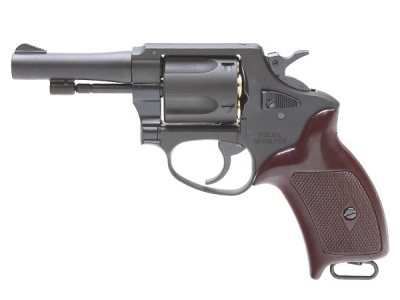
Nambu Model 60 - .38 Special
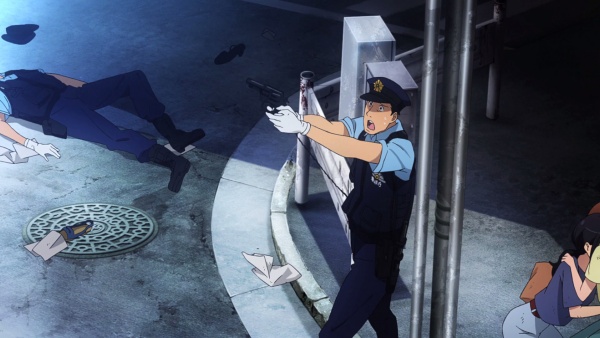
A police officer with his Nambu revolver. (Ep.1)
Submachine Guns
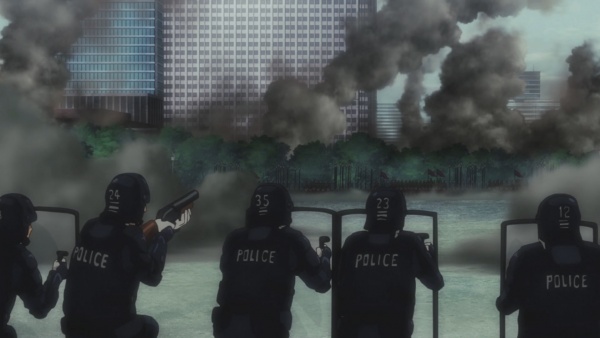
Heckler & Koch MP5
A MPD riot police officer is seen with a Heckler & Koch MP5 submachine gun while defending the Tokyo Imperial Palace.
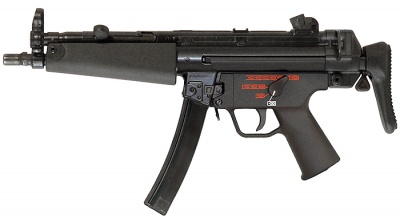
Heckler and Koch MP5A5 - 9x19mm
A MPD riot police officer on the right takes aim with his MP5 submachine gun when defending the Imperial Palace. (Ep.1)
Heckler & Koch MP7
Russian SVR Zaslon operators are seen with Heckler & Koch MP7 with suppressors. Kuribayashi acquires one for self-protection.
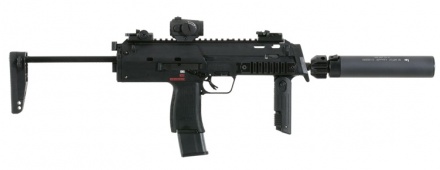
Heckler & Koch MP7A1 with 30-round magazine, sound suppressor and red dot sight - 4.6x30mm
Russian SVR operators with their suppressed MP7s. (Ep.9)
Russian operators aiming their MP7s in an unexpected encounter. (Ep.10)

A Russian operator fires his MP7. (Ep.10)
Another Russian fires his MP7. (Ep.10)
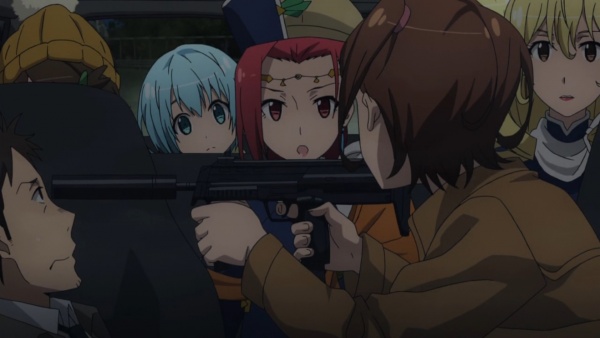
Kuribayashi aims her MP7, which she acquired from the Russian operators. (Ep.10)
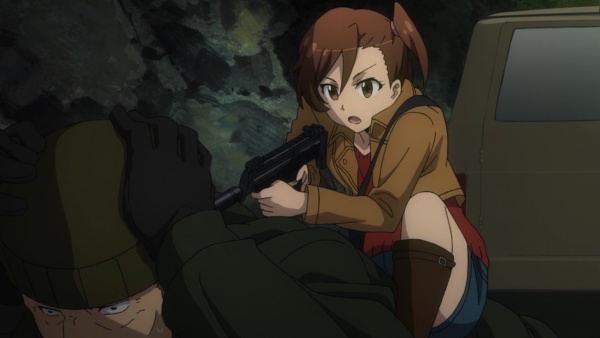
Kuribayashi holding a Russian operator at gunpoint with her MP7. (Ep.10)
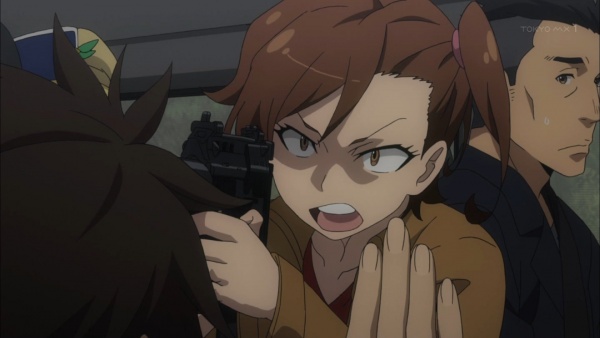
Kuribayashi aims her MP7 at Itami. (Ep.10)
Kuribayashi still aiming at Itami in another view. (Ep.10)
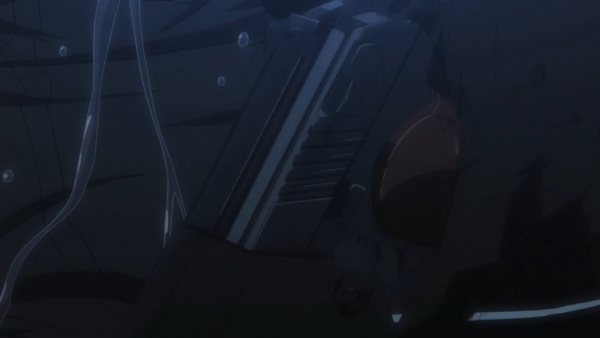
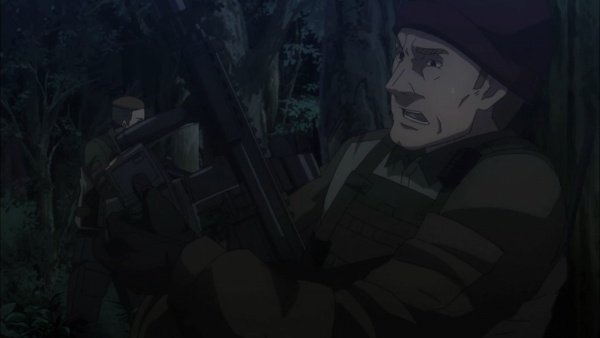
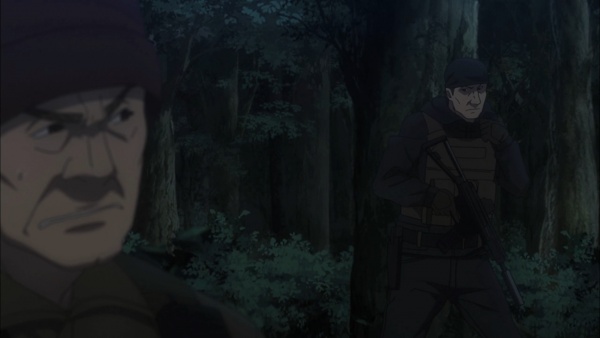
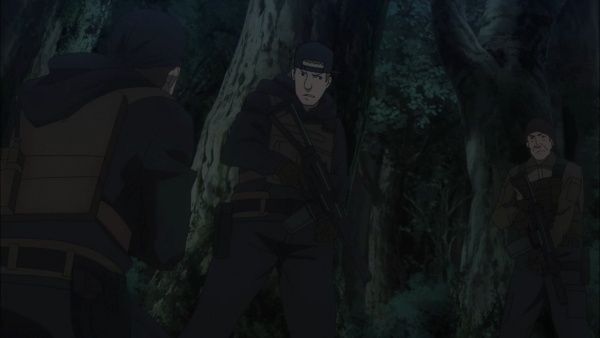
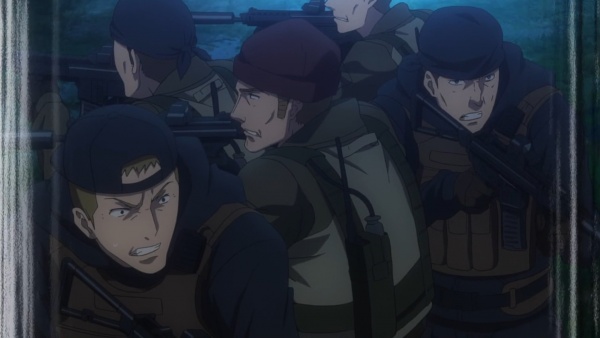
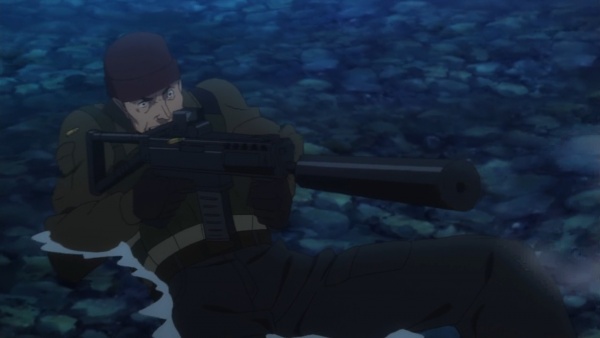
Sa. Vz. 82 Skorpion
Chinese MSS operators are seen with Sa. Vz. 82 Skorpions.
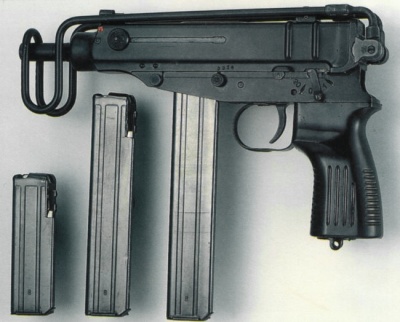
Sa. Vz. 82 Skorpion with spare magazines - 9x18mm Makarov
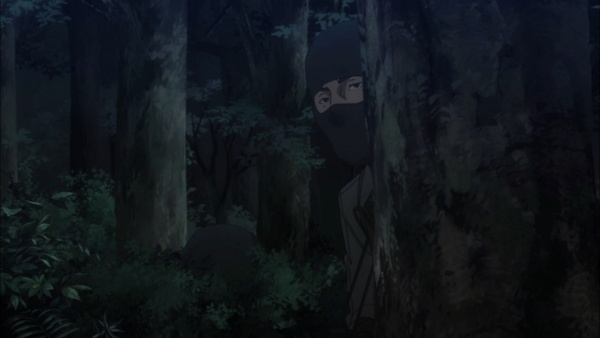
Chinese MSS operators appearing in the woods. We can see the skorpion stock clearly on the right operator. (Ep.9)
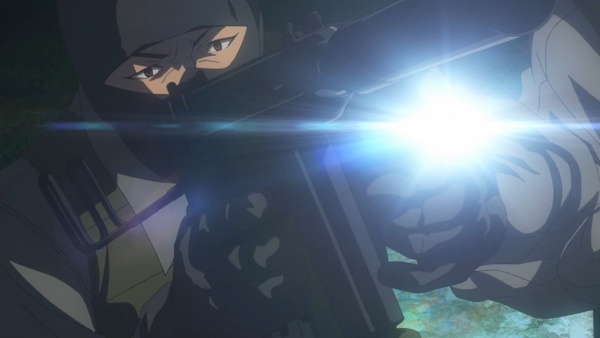
A Chinese MSS operator activates a flashlight while holding a skorpion. Note the straight magazine. (Ep.10)
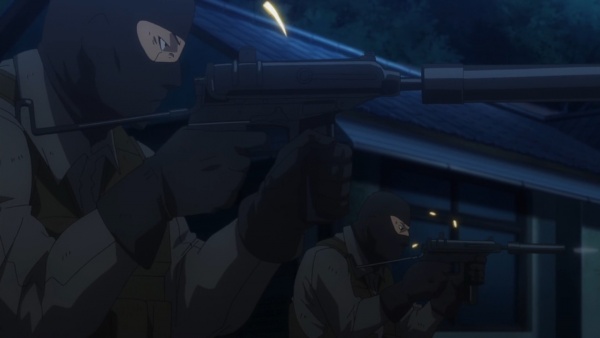
Chinese MSS operators fire their skorpions. (Ep.10)

A dead Chinese MSS operator with his skorpion nearby while another in the corner fires. (Ep.10)
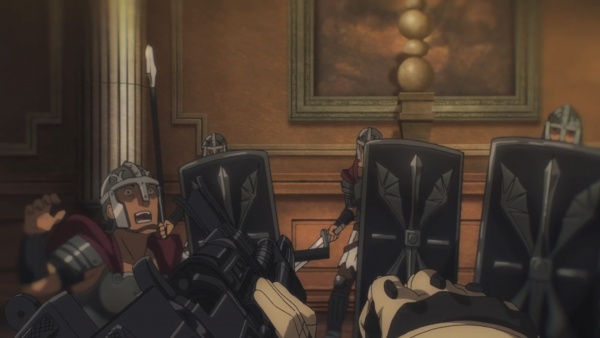
Rifles
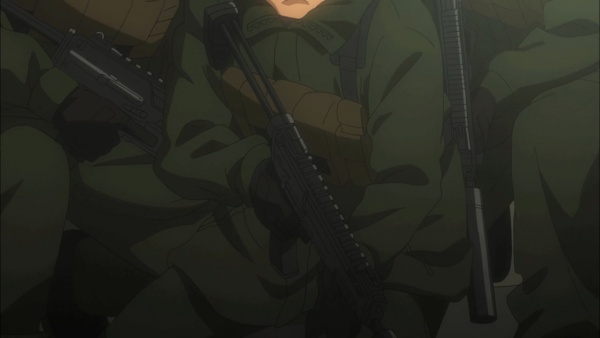
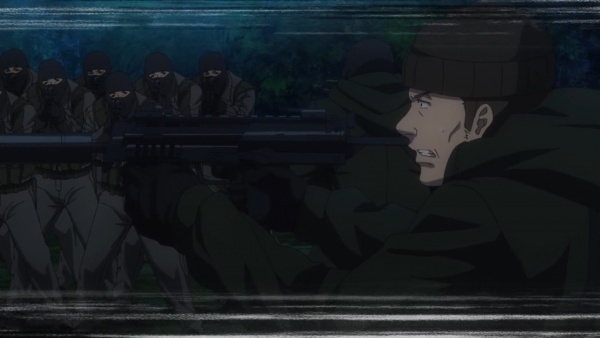
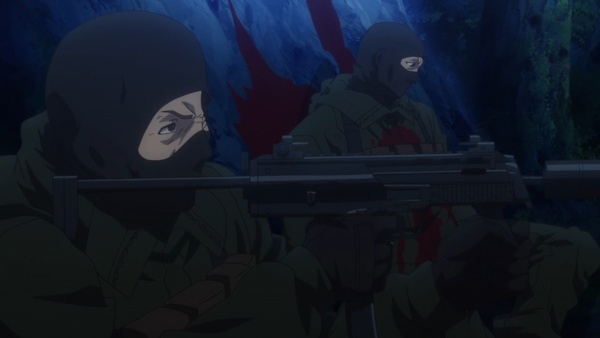
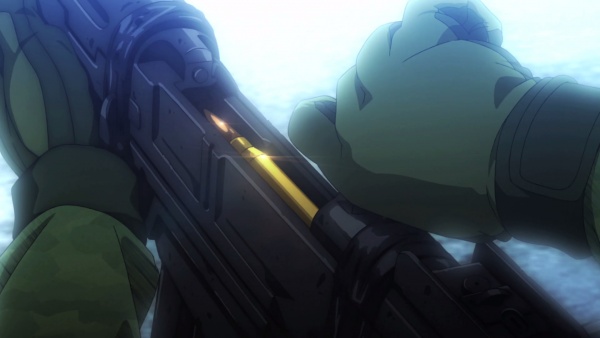
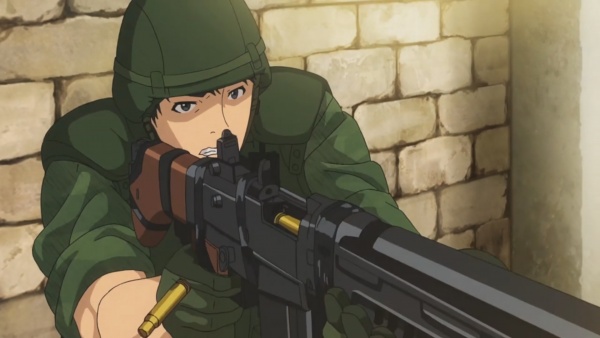
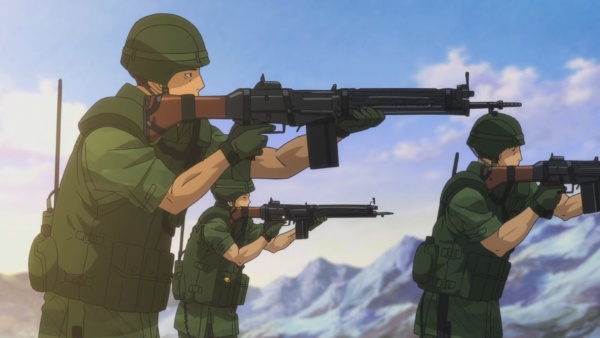
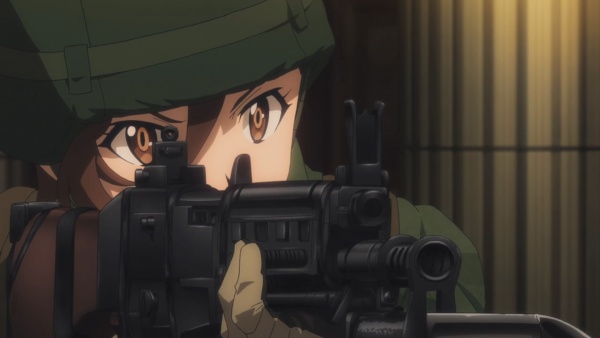
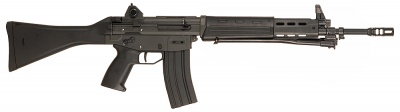
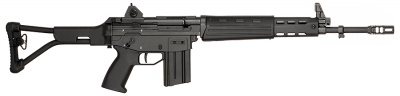
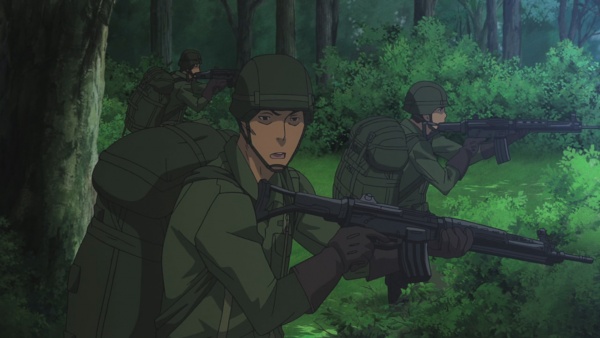
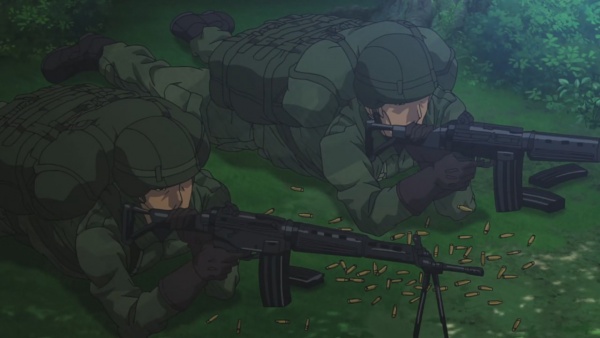
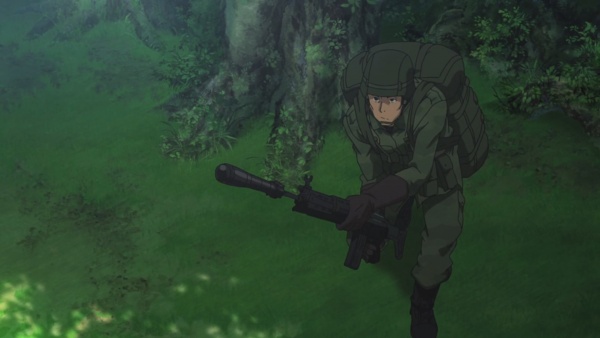
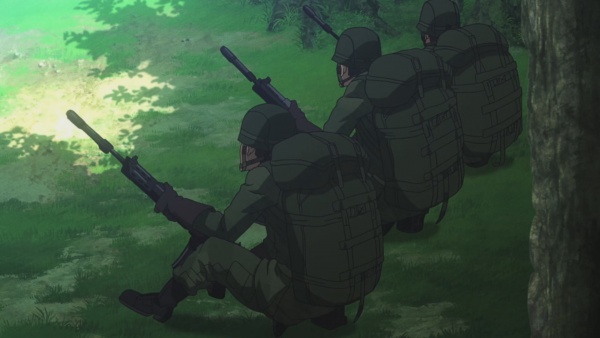
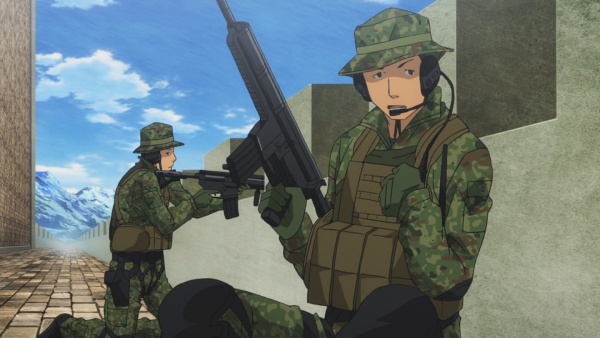
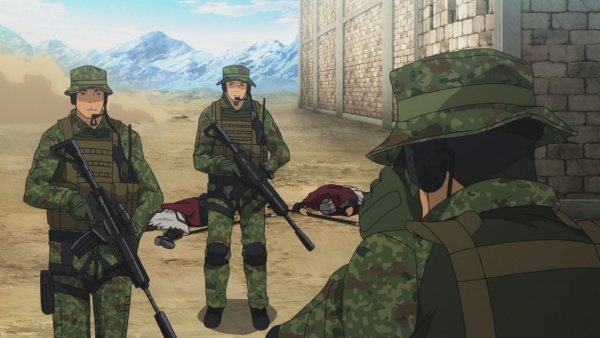
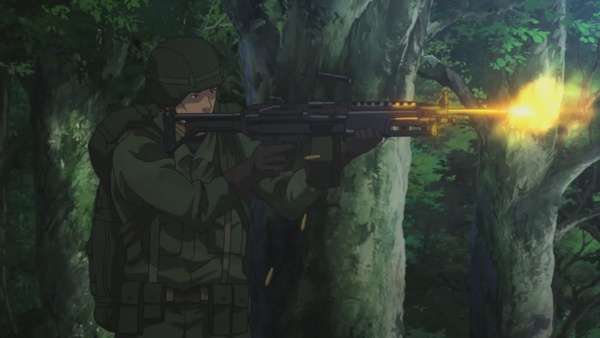
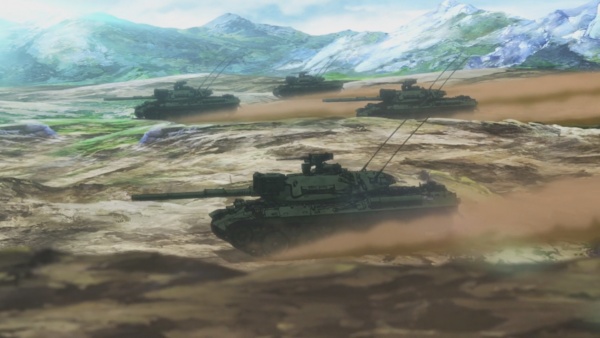
Howa Type 64
The JGSDF troops deploying to the Special Region are seen with Howa Type 64s. This is the most prevalent small arm in the series.
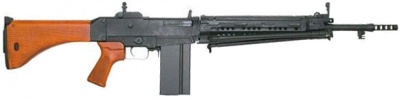
Howa Type 64 rifle - 7.62x51mm
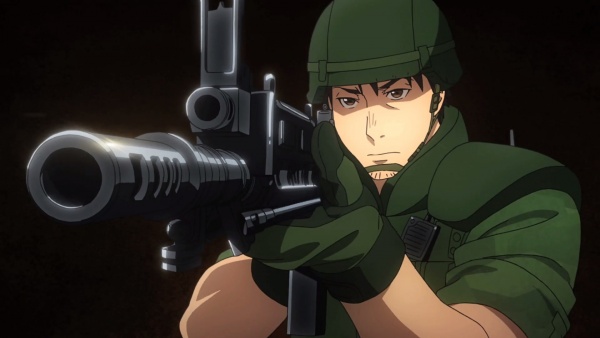
Itami aims his Type 64. (OP#1)
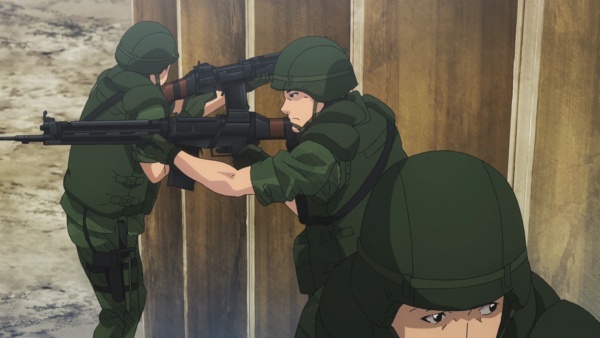
A JGSDF soldier aims his Type 64 with his bipod deployed. (Ep.1)
A view of the right side of the Type 64 receiver. (Ep.1)
A JGSDF soldier chambers his Type 64. (Ep.1)
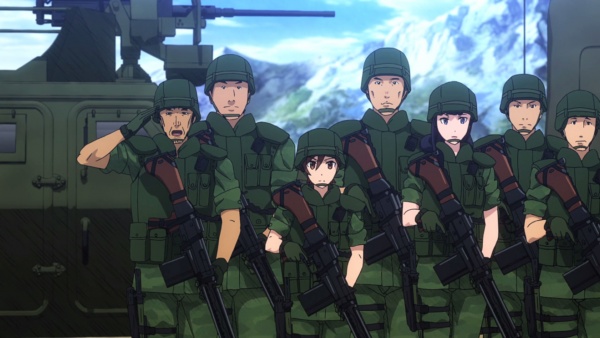
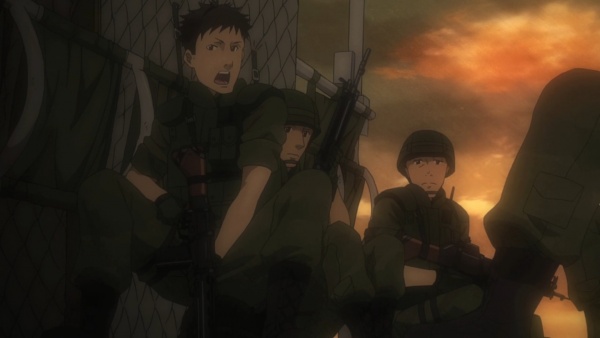
The Third Recon Team with their Type 64s. (Ep.2)
Private Tozu of Third Recon Team raises his Type 64. (Ep.2)
Sergeant Major Kuwabara with his Type 64. (Ep.3)

Kuribayashi, Kuwabara, and Itami with their Type 64s. (Ep.3)
Some JGSDF soldiers of 4th Combat Team with their Type 64 rifles as they replicate the helicopter scene from
Apocalypse Now. (Ep.6)
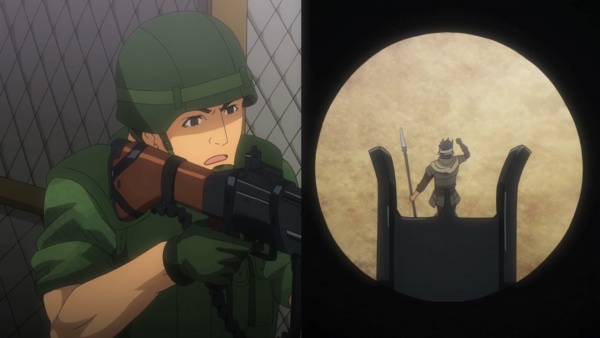
A JGSDF soldier with his sight picture of the Type 64 on the right. (Ep.6)
JGSDF soldiers conducting an exercise with their Type 64s. (Ep.7)

Kurata in the middle with his Type 64. (Ep.12)
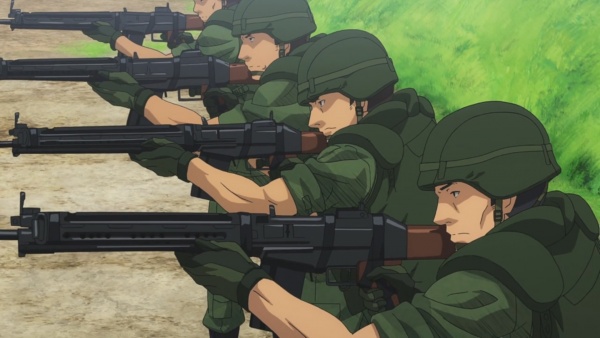
A line of JSDF soldiers fire their Type 64s at targets during a demonstration. (Ep.13)
A soldier of the Third Recon Team firing his Type 64. (Ep.23)
Several JGSDF soldiers fire their Type 64 rifles to hold back an Imperial cavalry. (Ep.23)

Kurokawa aims her Type 64 rifle. (Ep.24)

Howa Type 64 with attached bayonet - 7.62x51mm.
Kuribayashi aims her bayonet-equipped Type 64 at Imperial guards. (Ep.14)
A first-person view of Kuribayashi's Type 64 as it runs empty and the chambers locks open. (Ep.14)
Howa Type 89
During the Empire's attack on Tokyo, JGSDF soldiers are seen with Howa Type 89s. A Type 89 could be seen on an Kuribayashi's (chagrined) depiction of a JGSDF Ranger.
Howa Type 89 rifle - 5.56x45mm
Two JGSDF soldiers fight off the Empire's invasion with Type 89s. (Ep.1)
A JGSDF Ranger on the right with his Type 89. (Ep.7)
Howa Type 89-F
The folding-stock version of the Howa Type 89 is seen in use by JGSDF paratroopers.
Howa Type 89-F rifle - 5.56x45mm

A JGSDF paratrooper with his Type 89-F with the bipod deployed. (Ep.23)
JGSDF paratroopers with their Type 89-F rifles. (Ep.23)
JGSDF paratroopers firing their Type 89-F's with the bipod deployed. (Ep.23)
A JGSDF paratrooper prepares to fire a Type 06 rifle grenade with his Type 89-F. (Ep.23)
A line up of JGSDF paratroopers prepares to fire rifle grenades with their Type 89-F. (Ep.23)
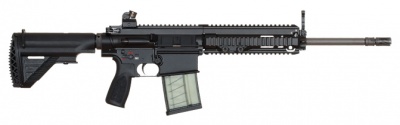
Heckler & Koch HK416
Japanese Special Forces Group operators are seen with Heckler & Koch HK416s.
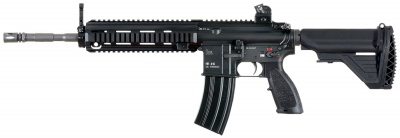
Heckler & Koch HK416 with 14.5 inch barrel - 5.56x45mm NATO.

A JGSDF SFGp soldier with his HK416 with a MOE stock and red dot sight. (Ep.23)
A JGSDF SFGp member with his HK416s. (Ep.23)
A JGSDF SFGp team with silenced HK416s. (Ep.23)
Heckler & Koch HK417
Japanese Special Forces Group operators are seen with Heckler & Koch HK417s. They have it with Magpul MOE retractable stocks, suppressors, and an Elcan scope with night vision.
Heckler & Koch HK417 with 16" barrel - 7.62x51mm NATO
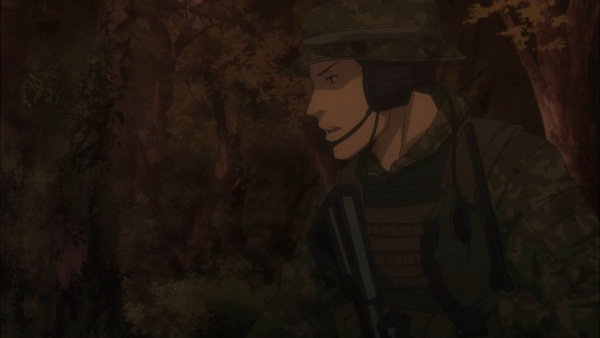
A JGSDF SFGp operator with his HK417 with MOE retractable stock. (Ep.9)
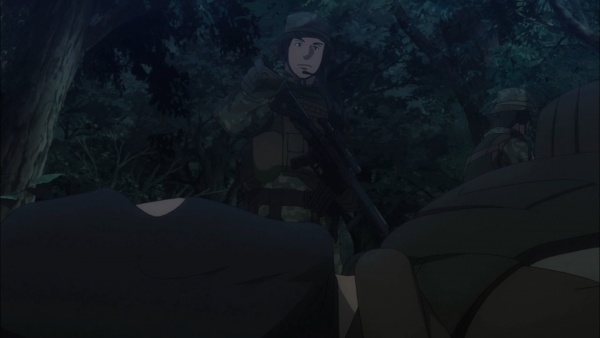
A JGSDF SFGp operator with his HK417. (Ep.9)
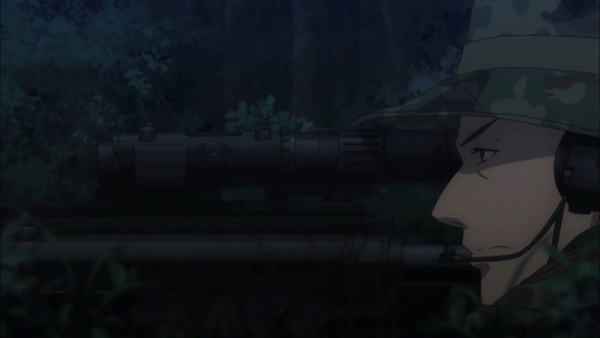
A JGSDF SFGp operator aims through an Elcan scope with night vision on his HK417. (Ep.9)
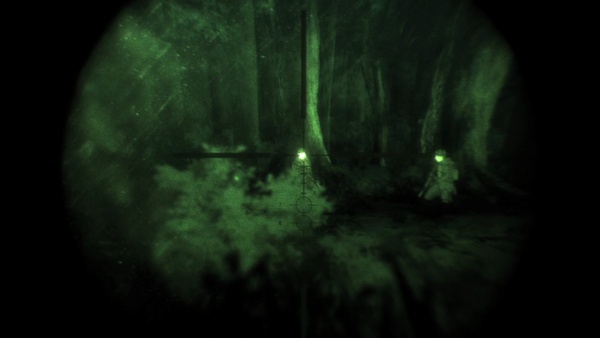
A view through the Elcan's reticle on the SFGp operator's HK417. (Ep.9)

A view of the receiver on the HK417. Note the round rib around the magazine release. (Ep.9)
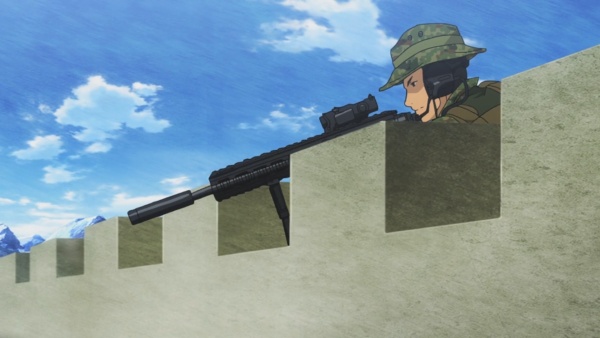
A JGSDF SFGp member fires his suppressed HK417. (Ep.23)
Knight's Armament PDW
American CIA SAD operators are seen with Knight's Armament PDWs equipped with suppressors and holographic sights.
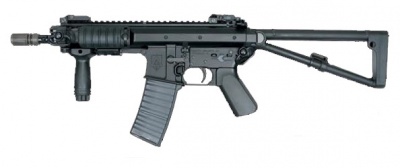
KAC PDW with 8" barrel - 6x35mm
Heidegger reloads his PDW. (Ep.9)

Ramirez fires his PDW. (Ep.9)
Another American agent with his PDW. (Ep.9)
Roger in the middle with his PDW. (Ep.9)
The American agents with their KAC PDWs. (Ep.10)

Roger with his KAC PDW and a flashlight in the other hand. (Ep.10)
Heidegger fires his PDW at Rory. (Ep.10)
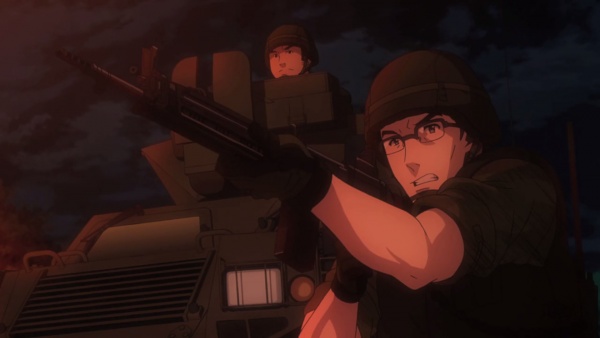
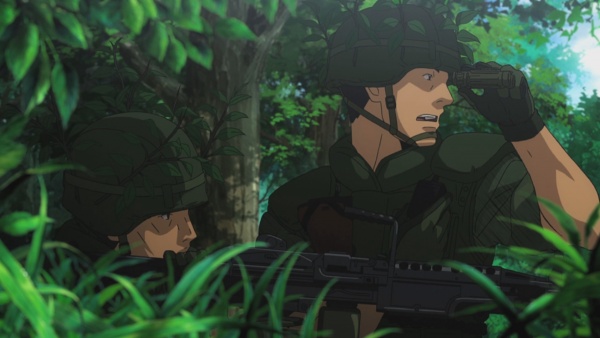
M4 Carbine
The JGSDF Special Forces Group (SFGp) team in the Imperial Capital are equipped primarily with M4 Carbines.
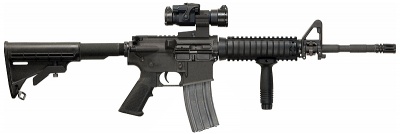
Colt M4A1 SOPMOD with M68 Aimpoint reflex optic - 5.56x45mm
A JGSDF Special Forces soldier with a M4 on the left. (Ep.14)
Machine Guns
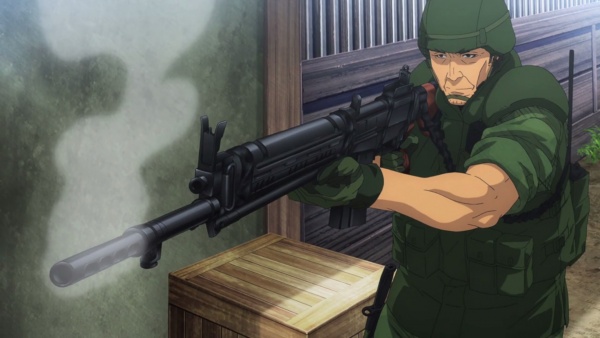
Sumitomo Minimi
The JGSDF uses the Sumitomo Minimi for infantry forces as their light machine gun.
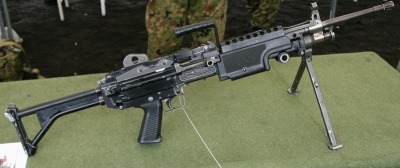
Sumitomo Minimi on bipod - 5.56x45mm
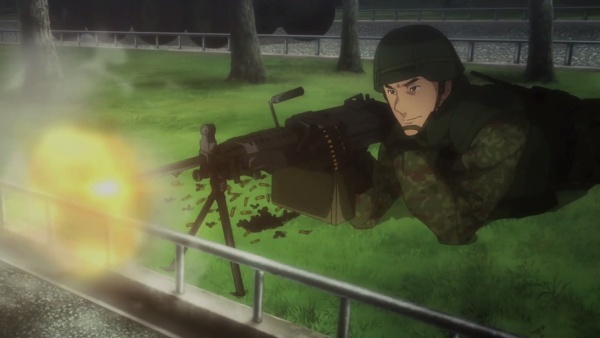
A JGSDF soldier fires his Sumitomo Minimi. (Ep.1)

A JGSDF soldier open fires with his Minimi in the defense of the Gate. (Ep.2)
A JGSDF soldier at surveillance with his Minimi. (Ep.13)
A JGSDF paratrooper fires his Minimi. (Ep.23)

A JGSDF soldier fires his Minimi. (Ep.23)
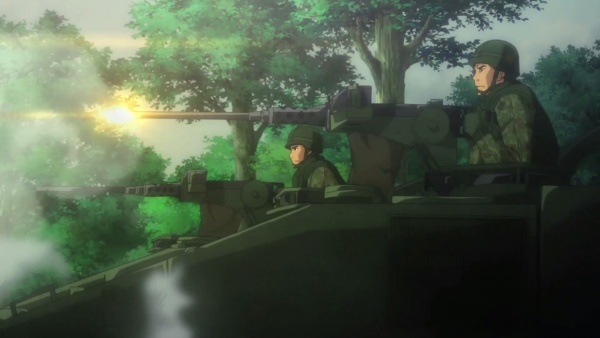
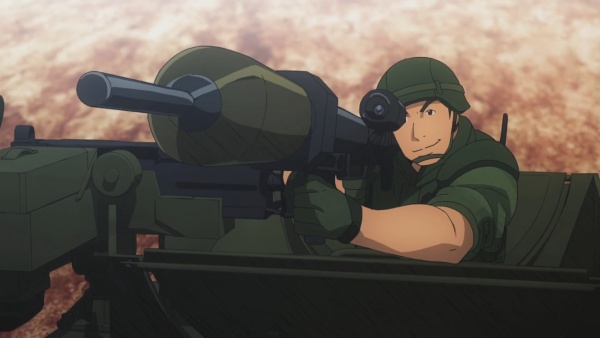
Sumitomo M2
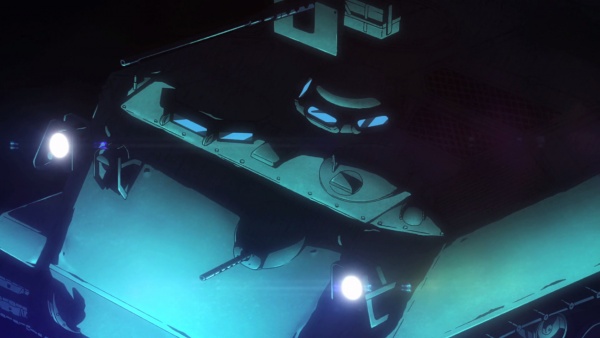
The JGSDF uses the domestically produced Sumitomo M2 on their vehicles.
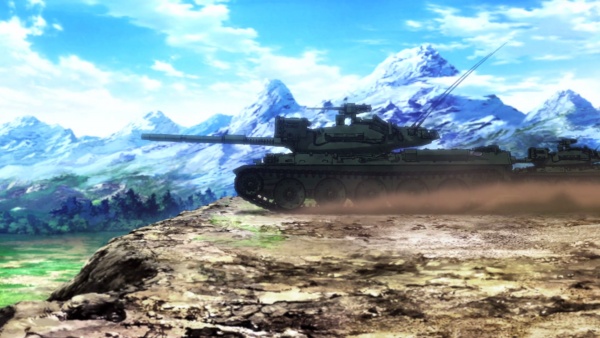
A Type 74 tank with a M2 machine gun on top. (OP#1)
JGSDF soldiers fire the M2 machine guns from their Type 96 APCs. (Ep.1)
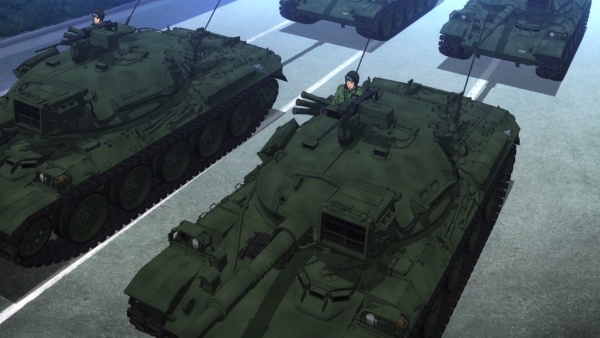
A Type 74 tank group, each with a M2 machine gun. (Ep.1)
A Type 75 Self-Propelled Howitzer with a M2 machine gun on top. (Ep.1)
A Type 73 Armored Personnel Carrier with a M2 on top. (Ep.1)
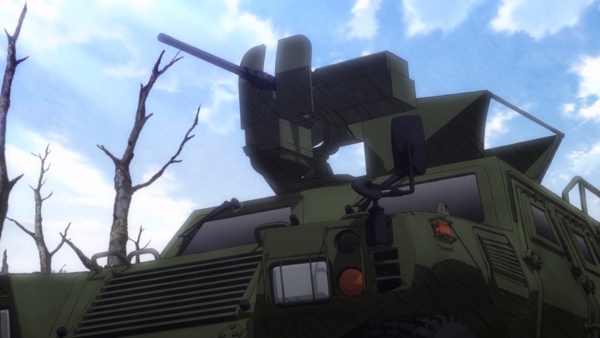
A Komatsu LAV with a M2 on top. (Ep.2)
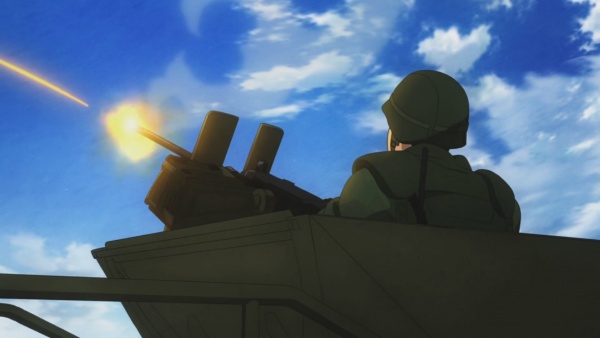
Sergeant Katsumoto open fire with the LAV's M2. (Ep.3)
Sergeant Katsumoto manning the LAV's M2. (Ep.3)
A Type 74 platoon with M2 machine guns on them. (Ep.7)
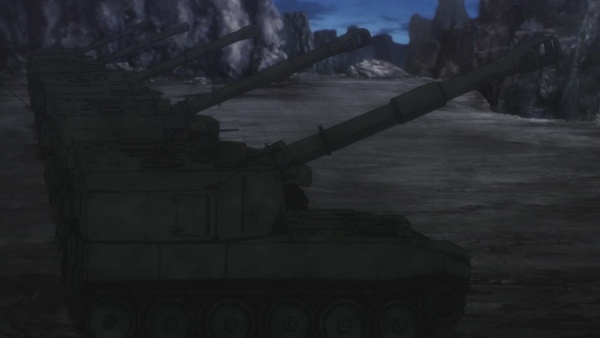
A battery of Type 75 Self-propelled howitzers firing, each with a M2 Browning on top. (Ep.17)
Sumitomo Type 74
A Sumitomo Type 74 machine gun is used on Fuji-made UH-1 Hueys.
Helicopter-mounted Type 74 machine gun - 7.62x51mm NATO
A Huey door gunner fires the M2. (Ep.6)
A Huey helicopter door gunner on the right with a helicopter-mounted M2. (Ep.6)
Browning M1919A4
A Browning M1919A4 is seen mounted on the hull of a Type 73 APC.

Browning M1919A4 - .30-06 Springfield.
A Type 73 Armored Personnel Carrier with the M1919A4 on the hull. (Ep.1)
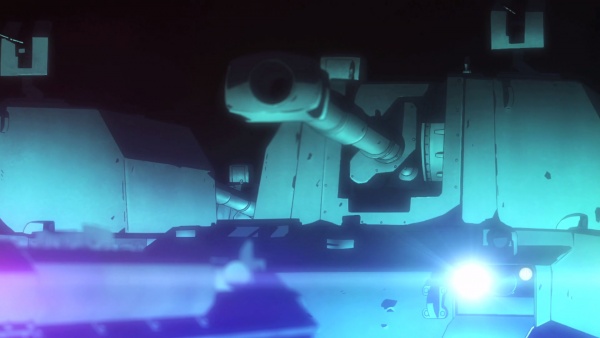
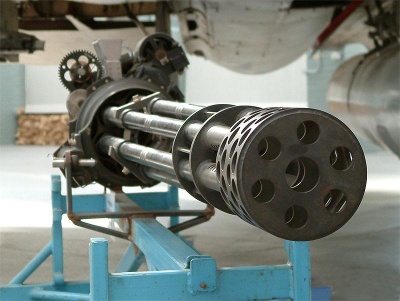
M197 Vulcan
The tri-barreled M197 Vulcan is seen in a chin mounting on JGSDF AH-1S Cobras.

M197 Vulcan 20mm chin-mounted on an AH-1Z "Viper", a newer version of the AH-1 Cobra.
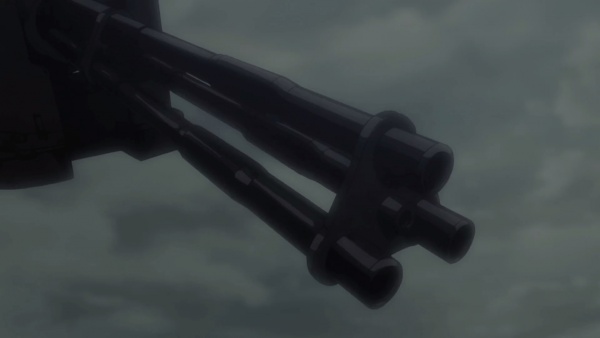
Close-up on an AH-1S Cobra's M197 Vulcan. (Ep.1)
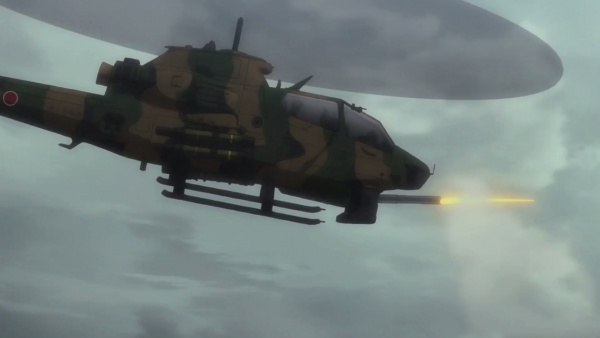
An AH-1S Cobra firing its M197 Vulcan. (Ep.1)
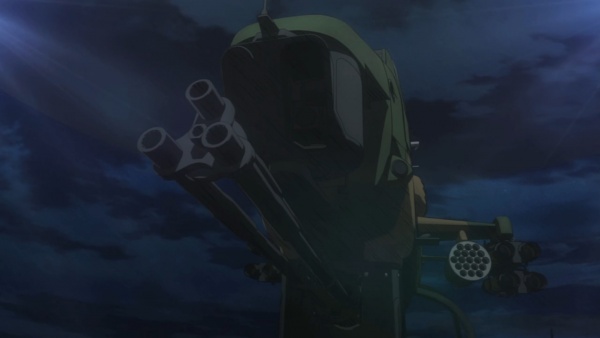
An AH-1S Cobra with its M197 Vulcan. (Ep.6)
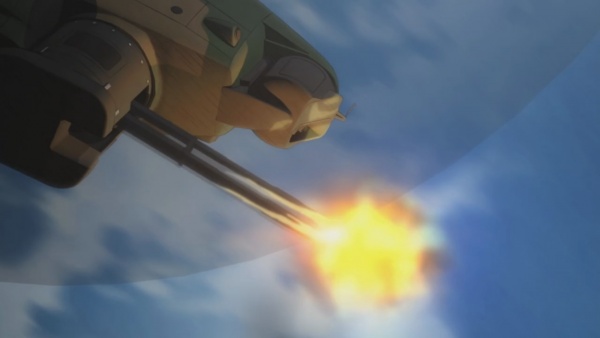
An AH-1S Cobra firing its M197 Vulcan during combat exercises (Ep.7)

The AH-1S Cobra firing its ATGM missiles. We can see the nose-mounted M197 Vulcan here. (Ep.17)
M61 Vulcan
The JASDF F-4EJ Phantom jets have the M61 Vulcan as its machine gun armament.
GE M61 Vulcan Cannon - 20mm

Two F-4EJ Phantoms of the JASDF have the M61 Vulcan as its machine gun armament. (Ep.11)

Two F-4EJ Phantoms of the JASDF. (Ep.14)
Two F-4EJ Phantoms firing their nose-mounted M61 Vulcan. (Ep.17)
35mm KDA twin autocannons
The JGSDF employs a Type 87 SPAAG with 35mm KDA autocannons during the defense of the Gate. The Type 87 35mm KDA autocannons are derivatives of the Oerlikon 35mm autocannons.

Type 87 self-propelled AA gun with 35mm twin AA cannon - 35x228mmR.
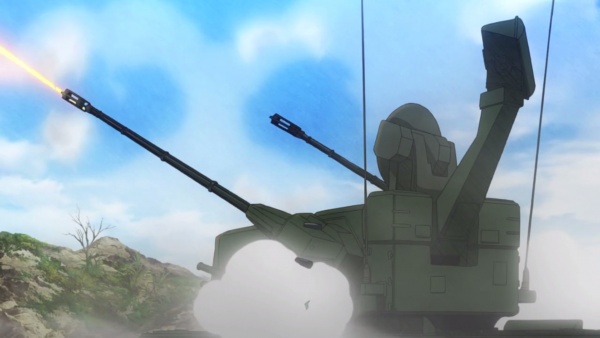
The JGSDF Type 87 firing its autocannons. (Ep.2)
Launchers
Minebea Gas Gun
MPD riot police officers fire tear gas canisters into the Empire's forces with Minebea gas canister launchers.
Riot police officers take aim with the gas gun when defending the Imperial Palace. (Ep.1)
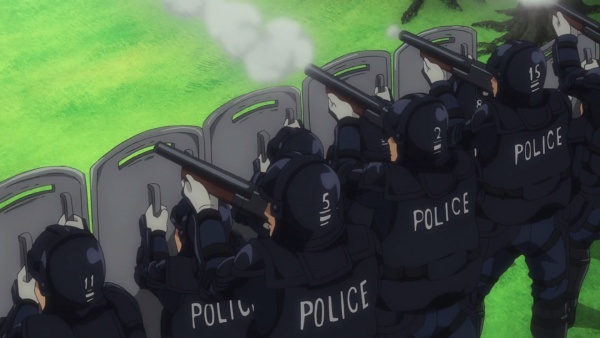
Riot police officers fires tear gas with the gas gun. (Ep.1)
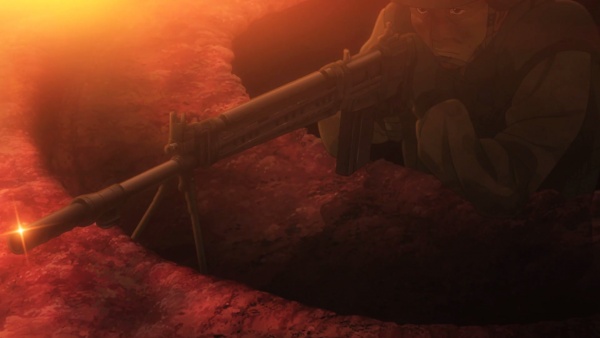
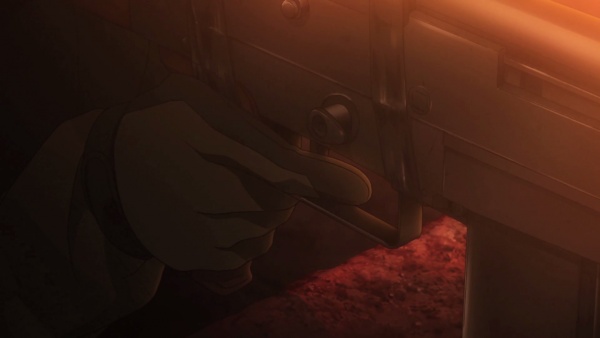
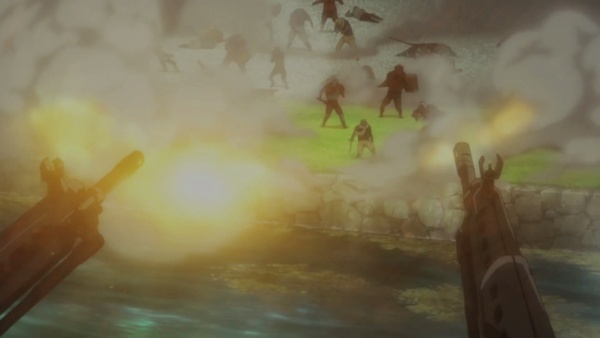
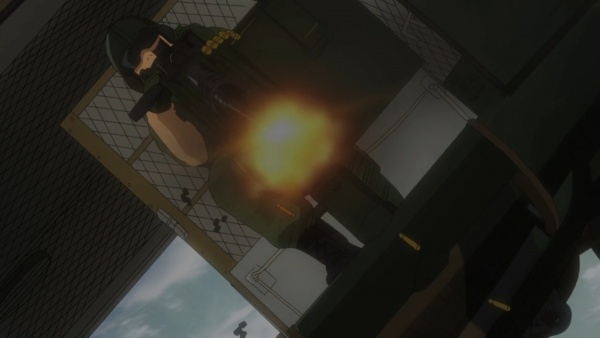
IHI Aerospace 110mm LAM
The JGSDF uses a 110mm LAM (Light-weight Anti-tank Munition, licensed Panzerfaust 3) as their main infantry anti-tank launcher. It is most notably used in the series to combat an ancient dragon.

Panzerfaust 3 with DM12A1 rocket and standard telescopic sight - 60mm
Sergeant Katsumoto take aim with the LAM. (Ep.3)
Close up on the trigger and safety of the LAM. (Ep.3)
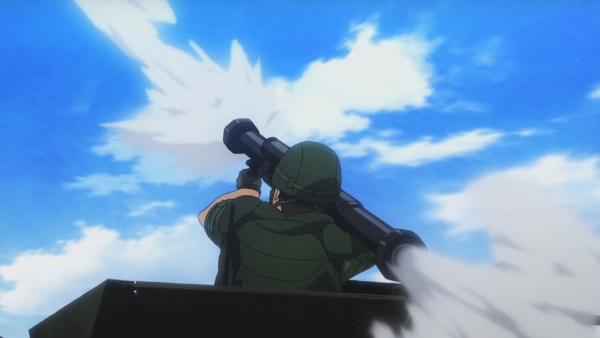
Sergeant Katsumoto launching the LAM. (Ep.3)
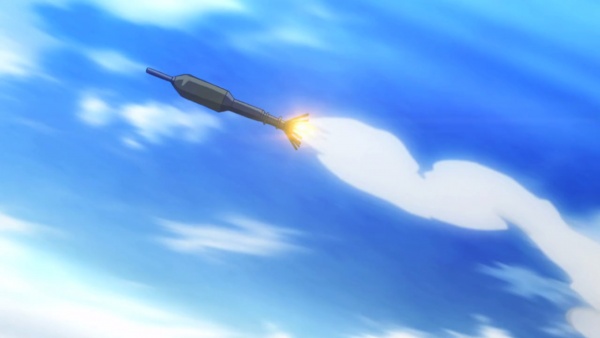
The LAM rocket in flight. (Ep.3)

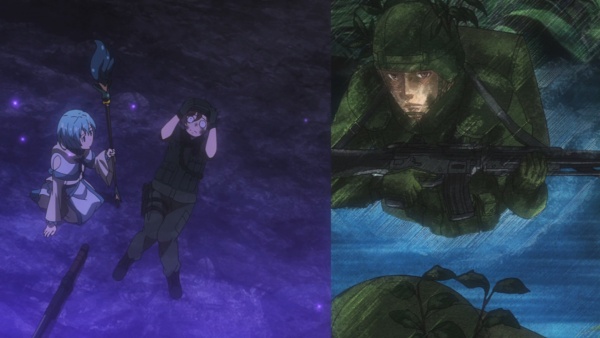
Itami aiming the LAM in the opening. We can see that the rocket is rather well detailed with the inscriptions. (OP#2)
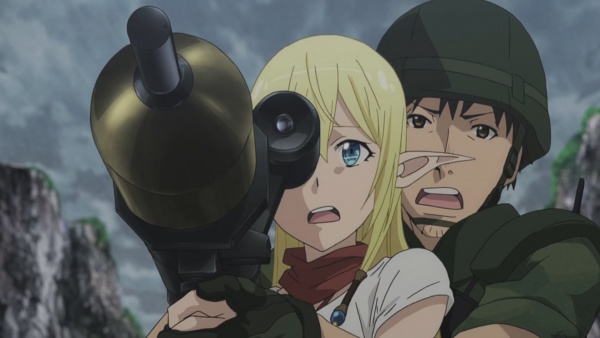
Itami and Tuka using the LAM. (Ep.16)
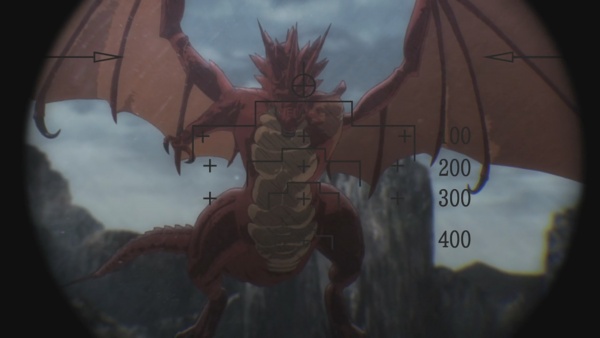
The reticle of the LAM. (Ep.16)

Itami teaching Crow, a dark elf, how to use the LAM. (Ep.17)
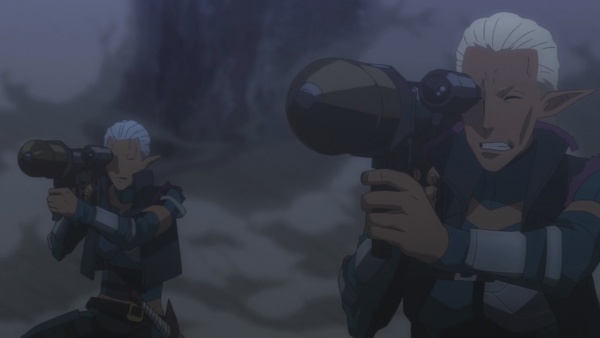
Crow and another dark elf using the LAM. (Ep.17)
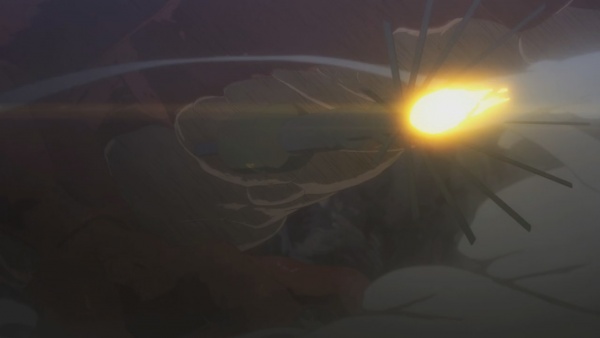
The well-detailed LAM rocket in flight. (Ep.17)
RPG-7
An explanation by Colonel Ryuuzaki on modern warfare has a guerrilla fighter fire an RPG-7.
In a short explanation video on the top left corner, a guerrilla fighter prepares a RPG-7 for firing. (Ep.9)
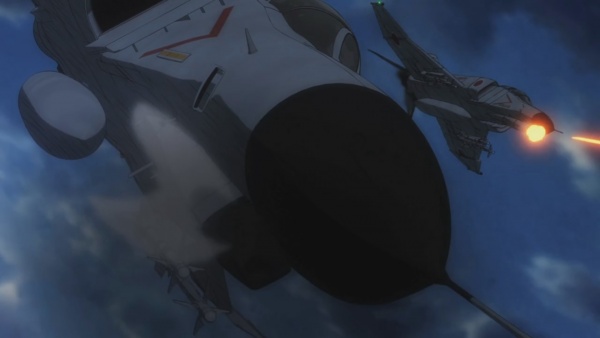
BGM-71 TOW
The BGM-71 TOW is used by JGSDF AH-1S Cobra gunships.
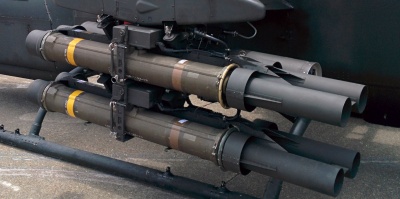
BGM-71 TOW mounted on AH-1W - 152mm
The AH-1S Cobra firing its ATGM missiles. (Ep.17)
Others
Type 53 Flare Gun
Itami uses a Type 53 Flare Gun during the Battle of Italica to mark his position.

Type 53 Flare Gun - 21.5mm/10 gauge.

Itami with the flare gun inside a vehicle. (Ep.6)
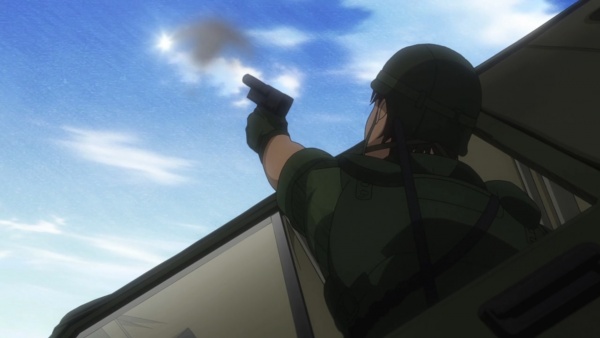
Itami fires the 10 gauge flare. (Ep.6)
L16 Mortar
Several 81 mm L16 Mortar were used during a demonstration to the Empire's senators.
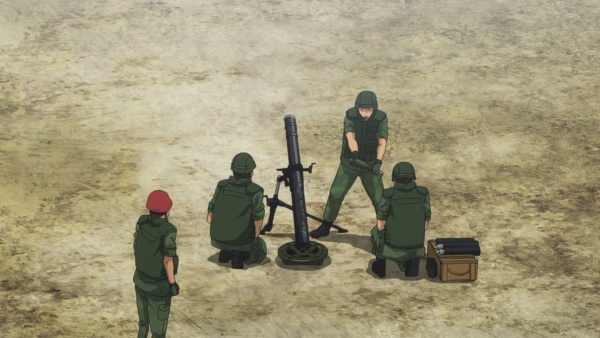
JGSDF artillerymen prepares the L16 mortar for firing. (Ep.13)

The round as it enters the L16 tube, here we see the fuse. (Ep.13)
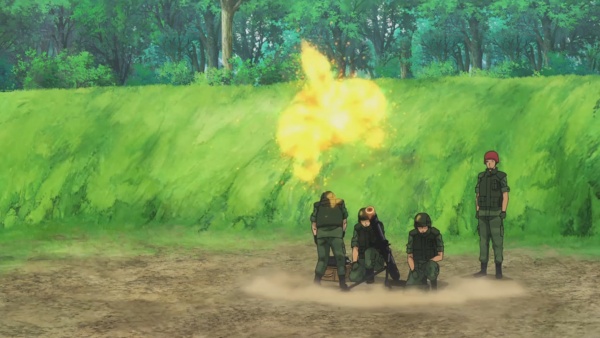
The L16 mortar firing its round. (Ep.13)
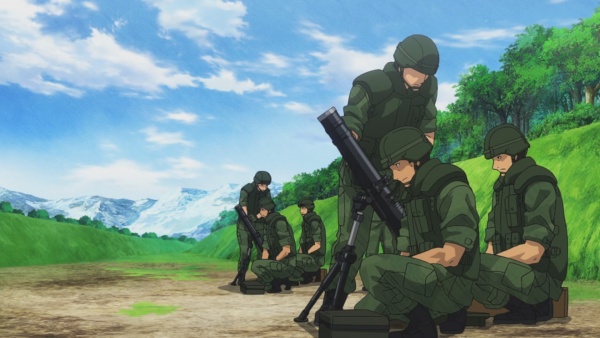
Two JGSDF L16 mortar team prepare to fire their rounds. (Ep.13)
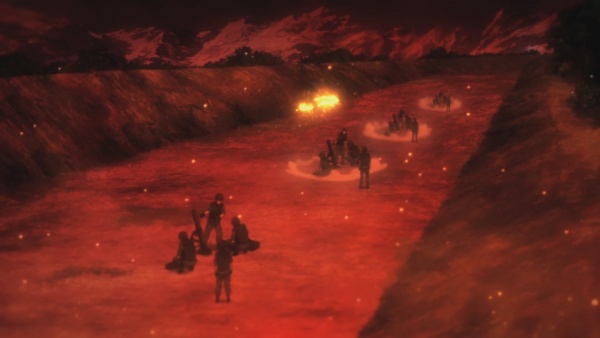
An envisioned scene of the JGSDF mortar team firing on the enemy. (Ep.13)
M26 Hand Grenade
The JGSDF uses M26 hand grenades as their frag grenade.
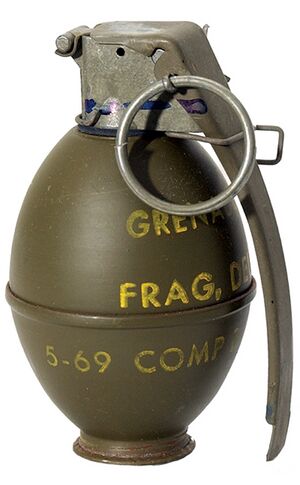
M26 fragmentation grenade
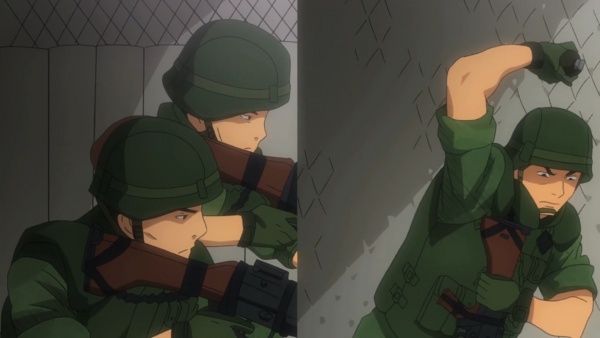
The JGSDF soldier on the right prepares to throw a M26 grenade. (Ep.6)
Bessara hiding in a building as a M26 grenade is thrown in. (Ep.13)

The M26 grenade rolling on the ground. (Ep.13)

Kurata arms a M26 hand grenade. (Ep.23)


.jpg)
.jpg)
.jpg)
.jpg)
.jpg)
.jpg)
.jpg)
.jpg)
.jpg)
.jpg)


.jpg)
.jpg)
.jpg)


.jpg)


.jpg)
.jpg)
.jpg)
.jpg)
.jpg)

.jpg)


.jpg)
.jpg)
.jpg)

.jpg)
.jpg)
.jpg)
.jpg)

.jpg)


.jpg)
.jpg)


.jpg)
.jpg)


.jpg)

.jpg)


.jpg)
.jpg)
.jpg)
.jpg)
.jpg)

.jpg)

.jpg)

.jpg)
.jpg)
.jpg)
.jpg)
.jpg)


.jpg)
.jpg)
.jpg)
.jpg)
.jpg)
.jpg)
.jpg)


.jpg)


.jpg)
.jpg)

.jpg)
.jpg)
.jpg)
.jpg)
.jpg)


.jpg)
.jpg)


.jpg)
.jpg)


.jpg)


.jpg)
.jpg)
.jpg)
.jpg)
.jpg)


.jpg)
.jpg)

.jpg)
.jpg)
.jpg)
.jpg)
.jpg)

.jpg)
.jpg)

